


DIY Wall Paneling Cheap Ideas
Okay but tell me why nothing transforms a basic room faster than wall paneling—especially when you don’t want to spend a fortune! If you feel like your space is missing that “wow” factor, a simple, affordable paneling project can make all the difference (and, yes, there are ways to do it that won’t break the bank or require construction superpowers).
FTC Disclosure: This post may contain affiliate links. If you use these links to buy something, I may earn a commission at no extra cost to you. I only recommend products I truly love for DIY projects.
Why DIY Wall Paneling Cheap Ideas Actually Work
- Instantly adds depth and character—even to boring, flat walls
- SO much more affordable than full renovations or hiring a pro
- Super renter-friendly if you go for peel-and-stick panel kits (no tools, no holes, no drama)
- Comes in tons of styles: shiplap, board & batten, geometric, or modern slats
- Covers up imperfections or old paint without heavy-duty prep
- Easy to swap out or paint over when you’re ready for a new look
Tools & Materials for Cheap DIY Wall Paneling
Here’s the low-key truth: you don’t need a big workshop or fancy gadgets. Just a handful of basics (plus one of those magical panel kits if you want to make things 10x easier).
| Item | Why You Need It | Pro Tip | CTA |
|---|---|---|---|
| Peel-and-Stick Wall Panel Kit | The fastest, cleanest way to create a paneled look—no nails, no glue, no mess | Start on a clean, dust-free wall for max stickiness | Check Price on Amazon |
| Level | Keeps your panels straight—nothing screams DIY fail like slanted lines | A smartphone app can work if you don’t have a physical level | Check Price on Amazon |
| Utility Knife or Scissors | Trims panels to fit outlets and corners | Cut from the back for cleaner edges | Check Price on Amazon |
| Painter’s Tape | Helps map your layout before you stick on the panels | Use low-tack tape to protect your paint/walls | Check Price on Amazon |
Disclosure: As an Amazon Associate I earn from qualifying purchases.
Save Time: Try a Panel Kit
No tools, no stress—just stick and go. These kits come in wood, foam, or 3D styles.
Renter-Safe Pick:
Removable panel kits won’t damage the wall (bye-bye, security deposit stress).
Mix Panel Styles
Mix vertical and horizontal patterns for a custom look (panel kits make this SO easy).
How to Do Cheap DIY Wall Paneling (Step by Step)
1. Pick Your Panel Style
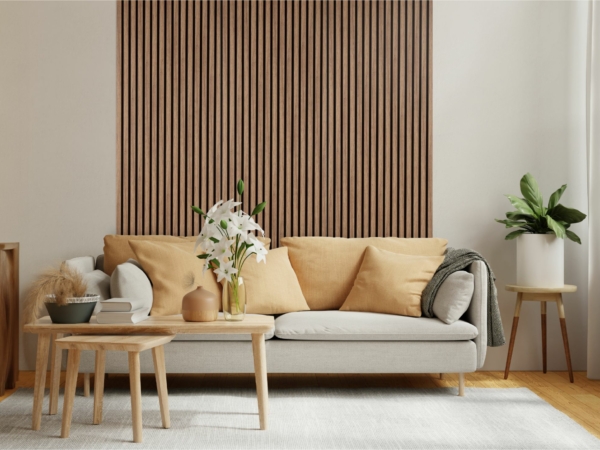
Decide what vibe you want: classic shiplap, modern slats, or a geometric grid. Peel-and-stick kits even come in faux wood, stone, and colored options (so fun and customizable!).
2. Measure & Plan Your Wall
Measure the height and width of your wall (or just the section you want to panel). Use painter’s tape to map out your design so you can step back and check the look before you commit.
3. Prep Your Wall
Wipe down the wall with a dry cloth. If you’re renting, make sure the paint is strong and not peeling so panels won’t cause damage (low-tack or removable kits are safest).
4. Stick On the Panels
Start at the bottom or in a corner. Peel the backing from the first panel and carefully press it to the wall, smoothing out air bubbles as you work your way across. Check each row with a level as you go for clean lines.
5. Trim Around Outlets & Corners
Use a sharp utility knife or scissors to trim panels as needed. For outlets, cut out a notch *just* big enough for a snug fit—no one will ever know the difference!
6. Step Back & Style
Once all panels are up, step back and admire your work. Add a few wall hooks, some art, or a cute shelf to finish the look.
Pros & Cons of Cheap DIY Wall Paneling
Pros
- Budget-friendly update for any room
- Lots of removable, renter-safe options
- No need for power tools or carpentry skills
- Covers flaws and old paint easily
- Transforms rental walls without losing your deposit
Cons
- Some stick-on panels may not adhere to textured walls
- Can be less durable than real wood paneling
- Occasionally leaves residue on old paint (always test a small spot first!)
Easy Do’s & Don’ts for Cheap DIY Wall Paneling
Do
- Clean your walls before starting
- Measure twice, stick once
- Test a sample panel in an out-of-sight spot
- Use painter’s tape to play with layouts first
- Opt for removable kits if you’re renting
Don’t
- Apply to damp, freshly painted, or dusty walls
- Skip the level—it’s your best friend
- Rush the trim work around outlets and corners
- Forget to save a few extra panels for future touch-ups
Where Cheap DIY Wall Paneling Looks Best
- Small entryways (makes them look finished—instantly!)
- Behind your bed for a makeshift “headboard” wall
- Living room accent wall (no one will know it’s peel-and-stick)
- Dining nooks or breakfast corners for a cozy vibe
- Rental hallways that need a little TLC
Final Thoughts (From Me to You)
These cheap DIY wall paneling ideas seriously changed how I think about “decorating on a budget.” If you thought paneling had to be expensive or permanent, I hope this gave you permission to go bold—especially if you’re renting or just love mixing things up every season. I’m obsessed with how much you can customize with modern peel-and-stick kits. Let me know what look you try!